


GETTING STARTED WITH ESSENTIAL ACCESSIBILITY™
What is eSSENTIAL Accessibility™?
eSSENTIAL Accessibility™ is an assistive technology application that helps people with physical, visual or hearing disability access computer systems & websites more easily.
Since releasing our previous version of eSSENTIAL Accessibility™, we have made the interface much simpler and enhanced the features our users
rely upon.
eSSENTIAL Accessibility™: A quick overview
eSSENTIAL Accessibility™ makes your computer more accessible than ever before by providing the following tools:
- Keyboard alternatives
- Mouse alternatives
- Text and image zooming
- Visual “click assist”
- Voice recognition
- Text-to-speech
About this manual
- While eSSENTIAL Accessibility™ works with older versions of Microsoft Windows, all instructions and images presented here presume the use of Windows
- Your copy of eSSENTIAL Accessibility™ will be updated from the version used to create this manual, so certain images and instructions may vary slightly from how eSSENTIAL Accessibility™ works on your computer. If you have any questions or comments, please email them to support@essentialaccessibility.com
- Where applicable, this manual contains voice commands you can use to do certain things, like opening a dialog or clicking the mouse within the Look for speech bubbles in the sidebar to the left for voice commands. To enable voice commands, refer to page 17.
INTRODUCTION: WINDOWS APPLICATION
What Is The Windows Application?
Thank you for choosing eSSENTIAL Accessibility’s™ assistive technology software. We’re excited to offer you technology that helps you live independently in an increasingly digital world by providing alternatives to traditional barriers such as a keyboard, mouse or touch-screen smartphone. This manual will provide an overview of the technology for the Windows platform, as well as specific features within the application.
Complementary applications exist for Mac and Android devices. You can start the download and installation process for these applications by clicking on the eSSENTIAL Accessibility™ icon on any website that features it.
System Requirements
eSSENTIAL Accessibility™ can be installed on any computer, laptop or tablet that meets the minimum requirements:
- Microsoft Windows 10, Windows 8, Windows 1 operating system (Windows 10 is recommended)
- Hardware able to run decently with the Windows version: 1GHz processor, 1 GB of RAM, DirectX9 graphic card
- 20MB of free space on your hard drive
- A Windows compatible webcam is needed for the Hands-free mode
- Microphone and speakers are needed for voice commands and speech over functionalities respectively
- An internet connection is needed to install the application
How To Install The Windows Application
To prepare your computer to use eSSENTIAL Accessibility™, follow these steps:
- In a web browser, visit www.essentialaccessibility.com
/download-app/.
You can also download the technology by clicking the eSSENTIAL Accessibility™ icon on any website that features it. - Select the application you wish to download from the options provided.
You will then be guided through the installation process. - Click the ‘Download Now’ graphic.
- A File Download - Security Warning dialog may appear. If so, click the ‘Run’ button.
- Follow the remaining on-screen instructions to complete the installa
If your browser does recognize the “.application” extension, like Microsoft IE or Edge, then the application will start directly. On some browsers like Chrome you may need to save the “.application” file and run it afterwards.
When run for the first time, it will download the application on your computer which has a size of 20MB. You will get a confirmation dialog regarding the download and installation.
GETTING STARTED WITH THE WINDOWS APPLICATION
Starting and Updating eSSENTIAL Accessibility’s™ Windows Application
Upon successful installation, a tile will appear on the Windows 10 start menu. Double click on the tile icon on your desktop or select it from the start menu.
Each time you start the application, it automatically checks for a newer version and asks you to install the update (if one is present). If you reject the update, you will not be notified about that particular update for one week.
If in the meantime another update is made available, you will be notified the next time you use the application. A new update will only download the updated features, this helps download the software quickly.
eSSENTIAL Accessibility’s™ Windows Application Description
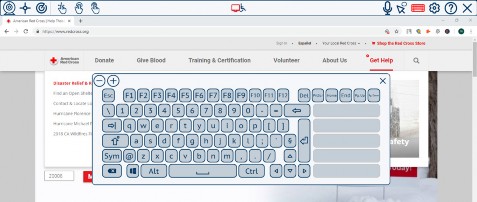
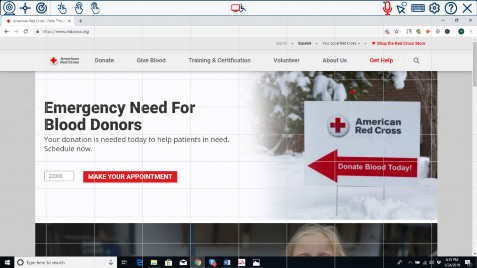
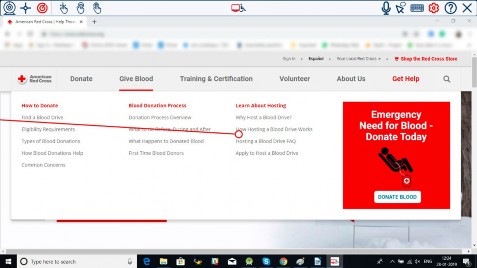
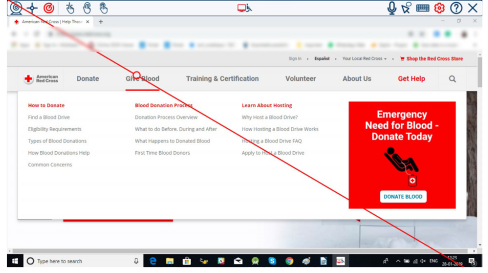
The application is a toolbar that places itself on the top of your screen and is always visible, allowing you to use the toolbar with other applications on your computer. Other applications will not occupy the space taken by the toolbar. On the figure below, you can see a typical image of what your screen looks like when the app is running.

On the toolbar you can see the tools organized from left to right (or right to left if you are using a right to left language):
| The three mouse replacement buttons: |
|---|
 Radar mouse Radar mouse |
| The click replacement buttons: |
|---|
 On-screen keyboard On-screen keyboard |
 Settings Settings |
 Exit button Exit button |
The buttons on the toolbar behave like switches. Your first click on the button will activate the feature and you will need to click the button again to disable the feature. When the related feature is activated the button color changes so that you can see which one is currently active.
For instance, if you click on the Keyboard button, then the keyboard will be shown, and the button becomes active. If you click again on the button, the keyboard is closed, and the keyboard button is disabled.
However, the “help” and “exit” buttons do not behave in the same way. Exit simply closes the application & help takes you to the eSSENTIAL Accessibility™ web page.
“Exit” Button or How To Close The Application
You can close the application by clicking on the “Exit” button with your mouse or any of the mouse-replacement tools. You can also use the voice command: “Exit application”. A confirmation dialog box will pop-up to avoid unwanted closure of the application.

Click Yes to exit and No to cancel.
Here are the voice commands (if enabled) to use on the confirmation dialog: “Yes” or “Ok” to confirm, “No” or “Cancel” to cancel.
“Help” Button or Getting Help On Using eSSENTIAL Accessibility’s™ Windows Application
When the button is clicked, the user manual is opened on your browser. You need an internet connection to use the “help” action as it is located on our server and not installed within the application.
You can also use the voice commands: “Show Help” or “Open Help”.
How To Move In The Settings
To open the settings, you can click on the settings button or use the voice commands “Open Settings” or “Open Options” or “Show Settings” or “Show Options”.
To close the settings just click again on the button or use the voice commands “Close Settings” or “Close Options” or “Hide Settings” or “Hide Options”.
When the settings page shows up your screen will look like the image below. Figure Settings

We can see that on the left side, there is a menu with the configuration sections that link to the corresponding functionalities. On the right side, there are the configuration items of the currently selected section on the left menu.
When a setting is changed, the change is applied immediately. There is no need to “Save” or “Cancel”.
General Settings
When opening the settings, you can click on the first section called “General”
which contains the main settings of the Windows Application.
Here you can:
- Change the default language by selecting the desired When the application starts for the first time, the selected language is the regional language predefined on your computer. If the language defined on Windows is not supported by the application, then it defaults to English. The language change is immediate and the whole user interface will be shown in the newly selected language.
- Select the mouse replacement you prefer to use when the application Once you’ve made a selection, the mouse replacement is set as default on your system. This ensures the mouse replacement of your choice is automatically selected when the application is activated. In the Mouse Replacement manual section, you will understand the different mouse replacement tools. The mouse replacement you select here will not start when you select it, it will only start when the application is running.
- Change the colors of the buttons when they are The default color is Red.
- Decide when you feel the application should start when you connect to your computer.
- Enable logging: it is disabled at the time of the first installa In case you are having troubles using the application, you can enable it and our support team will give you instructions on how to send us the generated log file. Don’t touch it unless requested by our support team.
- Reset all the settings to the default It may be necessary if you made some changes that do not fit your requirements and/or you do not remember what changes you made. The reset here will be applied to all the sections, not only the General sections.
USING KEYBOARD ALTERNATIVES
This application provides an on-screen keyboard which allows you to enter text using any mouse replacements activated in the toolbar.
How To Open or Close The Keyboard
The on-screen keyboard can work in two modes:
- Automatic: in this mode, the keyboard will pop up automatically when the cursor is placed on a field that accepts te It will close automatically as soon as the focus is given to a field not accepting text input. The keyboard works the same way as it would on your smartphone.
- Manual: you can decide when to open and close the keyboard using the keyboard button on the toolbar. When manually opening the keyboard, it will not close automatically and you will have to close it manually. Even when the keyboard is configured to automatically open and close, it can
always be manually opened and/or closed. But if opened manually, you will have to close it by yourself.
By default, the keyboard is set-up to be managed automatically.
To manually open it, you can click on the keyboard button. The on-screen keyboard will then pop-up and the keyboard button will become active. You can also use the voice commands (if enabled): “Open Keyboard” or “Show Keyboard”.
To close the keyboard, you can click on the close button on the keyboard header or click again on the keyboard button or use the voice commands: “Close Keyboard” or “Hide Keyboard”.
How To Use The Keyboard
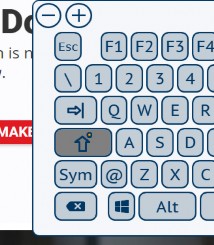
Here we can see an example of the keyboard:

The keyboard header contains the close button on the right and two other buttons “+” and “-“ on the left. Those ” +” & “-“ allow you to control the keyboard size.
The other keys correspond to the keyboard layout and behave like a standard keyboard. When a key is clicked, the respective command or input is sent to the computer.
The control keys “alt”, “Ctrl” & “Windows” keys have two states: Standard and Toggled. By default, the key is in it’s standard form. When you click on the key, it moves into its toggled state(Selected). Once toggled, the control keys work with the numbers & letters on the keyboard to provide various short cuts. Once the combination is used & sent, the control keys return to their standard state.
If you double click the “Windows” key, the key acts as it would on a normal keyboard & displays all the windows app & app finder. The Shift key is a special three states key. It can be toggled and locked. If you click once on it, it is toggled and behaves like the control keys above. As soon as you click on another key, its state is reset.
If you click on the “Shift” key twice, then it becomes locked, just like “Caps lock” on a standard keyboard. When the “Shift” key is locked, a small colored bullet is shown on the key. To unlock it, you need to click on it again.
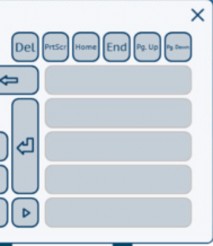
There are five big buttons on the right that present word predictions when you are typing. When one of these word predictions is selected, it appears in the text you are typing.
Managing The Keyboard Configuration
You can edit the keyboard configuration by clicking on the “Settings” button on the toolbar and then selecting the “Keyboard” section on the left side of the settings menu.

The flag “Auto-open keyboard” lets you select if you want the keyboards
opening/closing to be managed by the system (default) or by yourself.
If you don’t want to use the keyboard, then just untick the “Auto-open keyboard” flag. The keyboard will never show unless you click on the keyboard button on the toolbar.
You can also change the keyboard layout. The default keyboard layout is that of the currently selected language, but you can change it to any of the other supported languages.
You can also manage the size of the keyboard in a more precise way than what you can do by using the “+” and “-“ buttons inside the keyboard. In fact, here you can independently manage the width and height.
HOW TO USE THE ”SPEECH OVER FUNCTION”
The toolbar offers a speech over functionality that enables you to read out the description of the screen that is below the pointer.
Activating / Disabling Speech Over
The Speech-over functionality can be selected or unselected by clicking on the “Speech over” button on the toolbar or by using the voice commands “Enable speech over” or “Disable speech over”.
This functionality is available only if you have a “text to speech” engine on your
computer, see the sub-section “How to configure speech over” below.
Using Speech Over
This functionality is like a simple screen reader. It reads out the text under the mouse pointer. When you stop for around 0.5 to 1 second at the same place, the text is read.
When the text is read, it is highlighted by a small colored outline border to let you know what is currently being read.

The text to be read is provided by the application that is underneath the pointer. So, what is read highly depends on that application providing the information. Nowadays, most of the applications are providing the correct information but it’s possible that they do not.
In this case, it is not a misbehavior of the speech over functionality but is in fact the other application not providing the correct information.
The highlighted border that is drawn around the read element will not show on the desktop of Windows 8 and on the Start menu on Windows 10.
How To Configure Speech Over?
The speech over functionality can be configured by opening the settings and
selecting the “Screen reading” item in the settings menu.
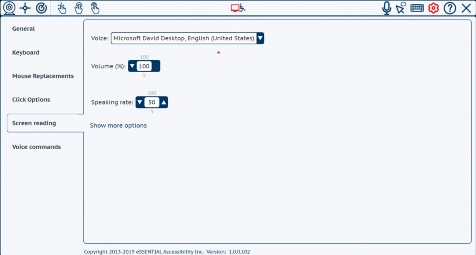
The “Voice” item lets you select which voice you want to use for reading the elements. Select the one you prefer from the list. If there is no voice for your language or need some more, please click on “Show more options” and see the description below.
The “Volume” lets you control the volume of the speech compared to the audio volume. The default is 100%, which means it is the same volume as your device audio volume. If you set it at 50%, the voice will have half the audio volume of the other audio streams, like music or movies. You cannot have more than 100% of your current audio volume, if you need to increase it, you need to increase the audio volume from your system.
The “Speaking rate” is the speed at which the voice will read text. ‘50’ is the default value and corresponds to the normal speed. Increase/decrease the value to make the voice speak faster/slower.
Adding Voices To Your System
By clicking on “Show more options” you will see if you have the possibility to have other voices available on the application.
The application can use three different types of voices
- SAPI 5 compliant desktop voices: either the ones that come pre- installed on Windows or third-party SAPI 5 v
- Mobile voices on Windows 10: any Windows 10 mobile voices availible on windows can added to the system and can be used by the applic
- Microsoft server voices: they can be added directly from inside the application (after installing the runtime).
Note: The best quality voices are generally the Desktop and Mobile ones. The Server voices have the lowest quality of the three.
Desktop Voices
Generally, Windows already comes with at least one pre-installed desktop voice (but it depends on the Windows version and the language version of Windows). The toolbar can use any of the pre-installed desktop voices that comes with Windows and even other SAPI 5 compliant voices you may have purchased from third parties. These voices are available on the “Voice” list above.
Windows 10 Mobile Voices
On Windows 10, the application can also use the mobile voices that are installed on your system and available to the Windows Store applications. The ones already available are listed in the voices list above.
However, you can add language packages that have some speech support to your Windows 10 installation in the Windows Region & Language settings.
To open the Windows 10 Region & Language settings, you can click on the button “Open Windows Language Settings”, it will then open the settings directly on the correct page which looks like:
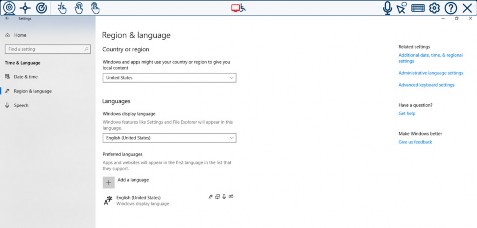
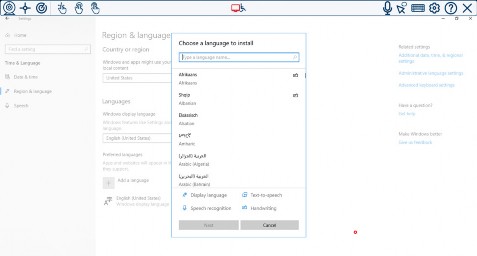
Click on “Add Language” and you will have a list of languages. You can then see if “text-to-speech” is available for it. Once you add it, Windows will install it in the background.
You will have to restart the application to be able to use newly installed text- to-speech voices. For some languages the system will add both mobile and desktop versions of the voice. All of them can be used by the application.
Microsoft Server Voices
If you are using an older Windows version and do not have the voice corresponding to your language you can also add a Microsoft Speech Server voice. On Windows 10, it is preferred to use the voices you can add to your system as they have slightly better quality than the ones of Microsoft servers.
For using the Microsoft server voices, you need to use the Microsoft Speech Server runtime and then install the voice you need.
If you do not have the Microsoft Speech Server runtime installed, you have the possibility to install it by clicking on the “Download and install” button and follow the installer instructions.
Once the runtime is installed, you will see a list of voices that are available for download. Select the one you want and click on the “Download and install” button and follow the installer instructions.
It is important to note that the Microsoft server voices will not show in the list of available voices until you restart the application to see it in the list.
HOW TO USE VOICE COMMANDS
The application can be controlled through voice commands if you have a compatible speech recognition engine. This is an alternate way of controlling the computer.
The commands are meant to control only the “eSSENTIAL accessibility Windows Application” functions not the functions of any other application.
Enabling / Disabling Voice Commands
Voice commands can be enabled or disabled by clicking on the “voice command” button. When the voice commands are enabled, the button is shown as toggled.
If your system does not have a speech recognition engine for the language you are using, then the button is not present on the toolbar and you cannot use voice commands. However, you can check if you can add a speech recognition engine in the voice commands settings that have been explained below.
Using Voice Commands
Voice commands needs a microphone that is in working condition. You can check your microphone in the Windows speech recognition settings page. It is recommended that you use a headset microphone that will not pick up any
background sounds. Thus, enhancing the voice recognition feature. Also, if you have activated the speech over functionality and are listening to music, the sound coming out of the speaker will interfere with your voice and create confusion to the speech recognition system.
When the speech recognition system from the application is hearing something, a small bullet shows in the “voice commands” button. If the bullet is not showing, it means your microphone is not functioning properly.
If a command is understood, the bullet becomes green. If the words understood by the system do not correspond to a valid command, the bullet turns red.
When a valid command is understood, it is executed.
You can give the command “Show commands” and it will open a page in your browser with a list of available voice commands grouped by category (context) as shown in the figure below:
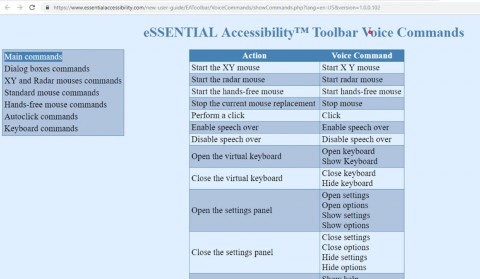
You can also get that list in the appendix of this manual. The commands are also explained when describing each functionality throughout this manual.
The voice commands are context sensitive. For instance, the commands for using the keyboard are available only when the keyboard is showing.
Configuring Voice Commands
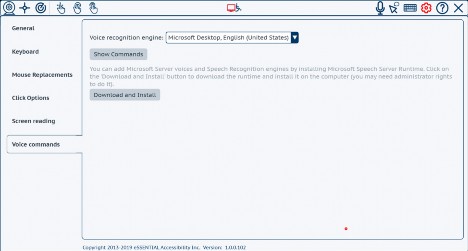
The voice commands can be configured by opening the settings and selecting the
“Voice command” item on the left of the settings menu.

If you have at least one speech recognition engine available for the current language, you can select one from the “Voice recognition engine” list. The list shows all the engines available for variants of your language. For instance,
in English, you may have a US English and a UK English or Canadian English speech recognition engine.
There are three types of speech recognition engines:
- The desktop speech recognition engine is the one installed with Windows. It depends on the Windows version and locale. On Portuguese Windows, for example, you may not have any desktop speech recognition engine.
- As far as the mobile Windows 10 speech recognition engine is concerned, these engines are available only on Windows 10. There are many more languages supported by these engines.
- The Microsoft Server speech recognition engine scan be installed from within the application itself. See Below.
The type of engine is included in the name, for instance “Microsoft Desktop English (United States)” is the US English desktop speech recognition.
Adding Speech Recognition
If you don’t have a speech recognition engine available for your system, or you want to add one, you can:
- On Windows 10, you may check the “Region & Language” settings on Windows and add the language package available for your Then restart the application to see if it appears.
- On any variant of Windows, you can add Microsoft Server speech recognition engines, if it’s available for your If the Microsoft Speech Server runtime is not installed, you must install it before.
- The installation of the runtime and available engines can be done inside the application by clicking on the “Download and Install” but The procedure is the same as that of adding server voices in the “screen reading” section.
HOW TO USE MOUSE ALTERNATIVES
The Windows Application offers several alternatives to using a mouse to control the mouse pointer and to perform clicks. Each method is designed to ease the process of moving and clicking the mouse.
The mouse and click alternatives can be selected directly from the left side of the toolbar.

They are:
- Hands-free mouse: control the mouse with your head mov
- XY mouse: control the cursor with a single or two switch(es) to scan the screen horizontally and vertically.
- Radar mouse: control the cursor with a single or two switch(es) to scan the screen like a radar.
You can start any of these mouse replacements using the keyboard shortcuts listed below:
- CTRL + F4: starts the “Hands-free mouse”.
- CTRL + F2: starts the “XY mouse”.
- CTRL + F5: starts the “Radar mouse”.
- CTRL + F1: stops any mouse replacement and goes back to standard
The CTRL + F1 shortcut is important as it allows you or someone that helps you to get back to controlling the computer in a standard way.
Using The Standard Mouse
This is the default mouse when starting the application. You can use your computer as usual, using a mouse, a joystick, or maybe another external application for controlling the mouse pointer movements. You can still use other features offered by the windows application to make your computer easier to use. For instance, you can use our on-screen keyboard, the speech over or voice commands functionalities.
The toolbar offers you also some features to make using the mouse easier. You can:
- Highlight where you click with a visual effect shown at the click location;
- Show a full-screen crossbar to help locate the cursor position;
- Control the mouse position using voice commands by either directly positioning the pointer to a cell in a virtual grid or by controlling an automated move either horizontally or vertically;
- Perform click and hold instead of releasing the mouse bu This is particularly important for people having difficulties in releasing the button precisely;
- Use different clicks with a single button (doing left/right clicks with only one switch for instance); and
- Use the auto-click
This mouse is the default mouse when no other mouse alternative is running, it is always started by default when stopping another mouse. If you are using another mouse replacement and need to get back in control of the computer using the standard mouse, you can give the voice command “Stop mouse”. You can also use the keyboard shortcut CTRL + F1 to do this.
Showing a ”Visual Click Assist”
See the “Improve click visibility” section to understand the visual effect. It is not a feature of the “Standard mouse” but a feature common to all mouse replacements.
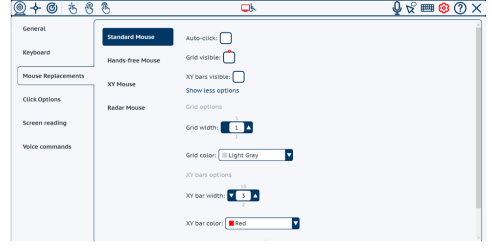
Showing a Crossbar

You can enable/disable the crossbar visualization by using the voice commands “Show crossbar” and “Hide crossbar” or in the standard mouse settings.
Open settings and select “Mouse replacements” on the left menu. Then select “Standard Mouse” on the second submenu.

Tick/untick the “XY bars visible” check box to enable or disable this feature. You can customize the color, bar width and center circle size by using the fields “XY bar width”, “XY bar color” and “XY sight-view radius” that appear when you click on “Show more options”.
Controlling The Mouse With Voice Commands
If enabled, you can control the movement of the mouse using voice commands. You can use an “analogic” movement or “digital” positioning using a grid system.
You can also combine commands to be faster.
As an analogic movement, we mean a pixel by pixel movement as you see while moving the mouse.
“Move left”, “Move right”, “Move up”, “Move down” commands will start the cursor movement in the given direction. The speed of the movement can be controlled using the commands “Move faster” or “Move slower” to increase or decrease the speed.
“Maximum speed” and “Minimum speed” commands will instead directly set the speed at its maximum or minimum value so that you can move fast to reach your destination zone and then move slowly to adjust the position. The “Click” command will perform the click and stop the movement. If you want to stop the movement without clicking just use the command “Stop moving”.
For “digital” positioning, the screen is virtually divided in a 10x10 grid. Columns are labelled from A to J and rows are labelled from 1 to 10. You can then use the commands “Go to D 6” to position the cursor to the center of the virtual cell at the 4th column and 6th row. You can also show and hide the grid by using the commands “Show grid” or “Hide grid”. The grid displays an overlay above the other applications.

When the grid appears, the labels of each cell are shown only for a few seconds and are then hidden to provide you with better visibility on your display.
If you need the labels to be shown again, just give the command “Show grid labels” and the labels will then appear for a few seconds. As you get used to it, you will see that you don’t need the labels to be printed or in fact the grid to be shown.
So, basically, you can jump directly to the screen zone you are interested in by using a “go to …” command and then perform the final positioning using the “Move …” commands at minimum speed.
Assisted Switch Device / One Button Press Device
Visit the “Standard click device” section to know more on this. It is not a specific feature of the standard mouse. Instead, it is linked to the click device.
Use Dwell Clicking
Instead of manually performing a click, you can have the click performed automatically for you by stopping the mouse at a given position for a second.
To enable this feature, open the standard mouse settings and tick/untick the auto-click check box. You can customize the auto-click functionality in the “Click options” settings. View the “Auto-click” section for more details.
Using Hands-Free Mode:
Moving the Mouse with Your Head
This mouse alternative enables the you to control the mouse pointer with your head. The head movements are seen from a webcam attached to the computer and will produce a mouse pointer movement. The pointer follows the movement of your head.
How Does It Work?
The images from the webcam are analyzed in real time, and the detected movements into the zone where your head is positioned are translated into mouse movements.
A standard webcam pointing directly on your face is needed for this functionality. Good lighting condition are necessary to have a smoother mouse control. The better the image quality, the better the control you have on the cursor position.
The default webcam device defined on Windows is the one used by the windows app when the application is opened. However, if you have more than one webcam on your system, you can select the one you prefer. See the “Configuring Hands- free mouse” section to see how to do it.
Starting / Stopping Hands-Free Mouse
To start this mouse, you can click on the “Hands-free mouse” button in the toolbar. You can also give the voice command “Start hands-free mouse” or use the keyboard shortcut CTRL + F4.
To stop it, you can click on the “hands-free mouse” button or give the command “stop mouse” or use the keyboard shortcut CTRL+F1.
When the “hands-free mouse” is running, the “hands-free mouse” button is toggled and the logo in the middle of the toolbar is replaced by the video thumbnail that gives feedback from your webcam.
Calibration
The process to define the zone in the image where your head should be (the zone where we compute the movements) is called calibration. You can have an automatic calibration at the start of this mouse, meaning that your face will be detected in the webcam video flow and the position will be computed, this is the default behavior.
If you have changed position and need to recalibrate, you can click on the video thumbnails on the middle of the toolbar or give the command “Webcam calibration” at any time while running this mouse. When calibrating a new window opens:
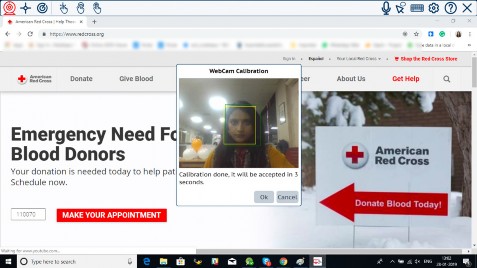
When the automatic calibration is started, just place your head where it should be when the cursor is on the center of the screen. A timer shows you how long it takes for you to position yourself correctly. Do not move until it tells you the calibration is done. The calibration result is shown as a yellow rectangle in the video stream. You can accept it or reject it by clicking on “Ok” or “Cancel”. If no action is performed, it will automatically be accepted after a given timeout.
If you have opted for the manual calibration, then select the rectangle zone by clicking a corner of the zone and then the opposite one.
Webcam Quality, Click function & Repositioning When you move your head, the cursor will follow the movement. As we said, it is important to have good lighting as the quality of the video is important for correctly computing
the movements. A minimum of 30 frame per second is necessary for the smoothest movement.
If it goes under that frame rate, the movement may be chunkier. Many webcams will have the framerate lowered when there is low light in the room. The rectangle color that shows the tracking zone gives feedback about the quality. If it is green, then it is perfect. If it becomes orange, the quality has started to degrade and it is red when the quality is very low.
For clicking, the default setting is to use dwell clicking. Just stop where you want to click for a few seconds and the click will be performed automatically.
However, you can also use any other click device. See the “Configuring
hands-free mouse” section to see how to select the click method. You can also perform double clicks, “drag & drop” and right clicks. See how to use it in the “Selecting the click action” section.
If you need to reposition the cursor at the screen center when your head is centered, you can do so by shaking your head twice horizontally. The cursor will go to the center and will stop there for a lapse of time before restarting to track your head movement.
Improving Usability With Voice Commands And Visual Effects
Like with the standard mouse you can improve your experience using voice commands to control the cursor through grid like positioning. See the details of the grid functionality in the standard mouse description section.
You can also show an XY crossbar as with the standard mouse. This refers to a vertical & horizontal line that intersect where the cursor would be. A circle is shown where the lines meet and this acts as the mouse cursor. This improves visibility for those who might have trouble locating the cursor.
As for any mouse, you can also show a visual effect at the click location. View the standard mouse description for further instructions.
Configuring Hands-Free Mouse
For configuring the hands-free mouse, open the settings and select “Mouse replacements” on the left menu and then “Hands-free mouse” on the submenu.
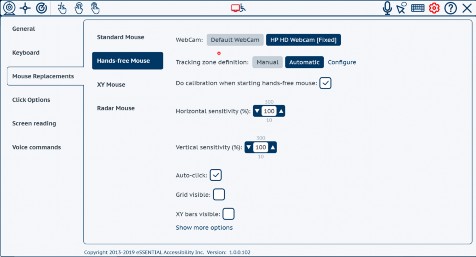
The webcams you can use are listed on top. You can select the one you prefer. Leave the selection to “Default Webcam” if you always want to use the one set as the default webcam on Windows. Otherwise, select another one.
The tracking zone definition, or calibration, can be selected as Automatic
(default) or Manual.
In Automatic mode, the face recognition algorithm will detect your face
position to define that rectangular zone.
In Manual mode you need to define the zone by yourself, this can be useful if the movements you want to track are not the ones of your head but for instance a finger or something else.
If you click on the “Configure” button, it will start a Calibration process even if you are not currently using the Hands-free mouse. If you don’t want to do the calibration each time you start the hands-free mouse, then simply unselect “Calibration” when starting the hands-free mouse.
You can decide to automatically start a calibration at each start of the Hands- free mouse (default behavior) or not by ticking/unticking the “Do calibration when starting hands-free mouse” checkbox.
You can adjust the sensitivity of the cursor movement compared to your head movements both in horizontal and vertical directions. The higher the value, the faster the cursor will move. You may adjust these settings to be able to easily reach all the screen corners and have good control on the cursor
The “Auto-click” checkbox lets you define if you prefer a dwell click or click by
other means (mouse device, switch device, …).
You can show or hide the grid by ticking/unticking the “Grid visible” checkbox. You can show or hide the XY crossbars for highlighting the pointer position by
ticking or unticking the “XY bars visible” checkbox.
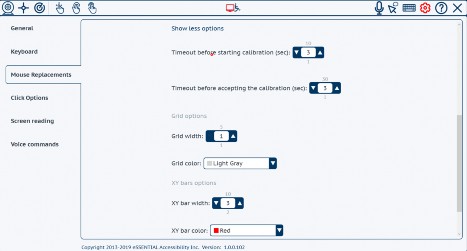
Selecting “Show more options” gives you the possibility to customize the delays in the calibration process as well as customizing colors and sizes of the grid and XY bars.
Using an XY Scanning Mouse Replacement
How XY Works And How To Use It
If you are a switch user and cannot use a mouse controller, you can still fully use any application with the XY mouse. The mechanism is quite simple, the screen is scanned vertically from top to bottom:

When you reach the desired vertical position, it scans horizontally and you can click when you have reached the desired position. The cursor then stops and a click is performed there.

When a click is performed, the cursor will stop for a few seconds and then it will resume scanning. This delay after the click gives you the ability to click again at the same position. It is important because in some case you need to click multiple times at the same place (for instance a scroll button, or a zoom button). Without this delay you would not be able to do it. This feature allows you to double click wherever the need may arise.
With a single switch you are then able to fully manage your computer. You can even generate a right click or start a drag & drop thanks to the click replacement buttons. (see the “Selecting the click action” section).
You can also enter text using the keyboard. When the keyboard is open, the XY scanning operates only inside the keyboard to be faster while writing. Otherwise, the scanning would always go through the whole screen, which would take a long time.
The trigger for XY is a left click, so if you are using a switch device, it must be mapped as a left click.
If you can use a second switch device mapped to the right click, then you can improve the usability. In fact, a right click will reverse the scanning direction. Just imagine you passed over the position where you wanted to stop, just right click, and it will go back to where it came from. Thus, giving you the ability to click where you want to, without waiting for a full screen scan.
This revert scanning direction can also be done with the “Reverse direction” voice command.
Starting / Stopping XY Mouse
You can start this mouse by clicking on the “XY mouse” button on the toolbar or give the voice command “Start X Y mouse”, if enabled. You can also use the keyboard shortcut CTRL + F2 to start this mouse.
When the XY mouse is running, the corresponding icon in the toolbar is selected and you see the scanning bars moving.
To stop it, just click again on the “XY mouse” button or give the voice command “Stop mouse” or use the keyboard shortcut “CTRL + F1”.
Configuring XY Mouse
To get to the XY mouse configuration, open the settings, select “Mouse
replacements” on the left menu and then “XY mouse” on the submenu.
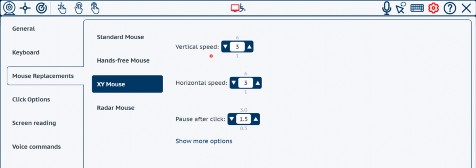
There you can configure the scanning speed both in horizontal and vertical directions. The faster the speed, the quicker you reach the click position, but the more difficult it is to click precisely where you want.
There is a small delay after a click is made, it is after this delay that the scan is resumed. The delay restarts after each click. If you click multiple times at the same location, the delay will apply from the last click.
You can also configure color and size of the XY bars when clicking on “Show
more options”.
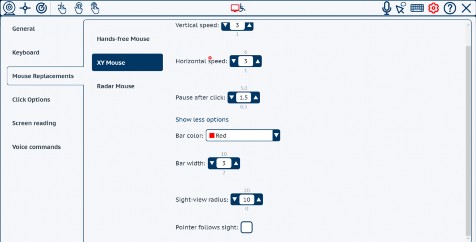
The “pointer follows sight” allows the standard mouse cursor to move with the horizontal & vertical lines. When unchecked, the pointer stays where it was until you make a click, then the pointer is moved to the click position
before clicking. It is sometimes necessary to have the pointer follow the sight when popups are showing only when you are hovering.
Using Radar Mouse
The radar mouse follows the same principle as the XY mouse, but instead of scanning vertically then horizontally, the scan takes place in a circular motion. It first scans the angular direction and then scans the distance from a reference point that can be either the center of your screen.
or the top left corner
It is used similarly to the XY mouse, it is worth reading the XY mouse section to have a better understanding. The first click stops the direction scanning and starts the distance scanning, the second click triggers the final click.
We also have the possibility to revert the scanning direction like with XY mouse.
Starting / Stopping Radar Mouse
You can start this mouse by clicking on the “Radar mouse” button on the toolbar or give the voice command “Start radar mouse”, if voice commands are enabled. You can also use the keyboard shortcut CTRL + F5 to start this mouse.
When the radar mouse is running, the corresponding icon in the toolbar is toggled and you can see the scanning bars moving.
To stop it, just click on the “radar mouse” button again or give the voice command “Stop mouse” or use the keyboard shortcut “CTRL + F1”.
Configuring Radar Mouse
To get to the radar mouse configuration, open the settings, select “Mouse
replacements” on the left menu and then “Radar mouse” on the submenu.
You can define the reference point to be either on the top left corner or the
screen center.
You can configure the speed of the scanning both in angular and radial directions. The faster speed the quicker you reach the click position, but the more difficult it is to click precisely where you want.
There is a small delay after a click is made, it is after this delay that the scan is resumed. The delay restarts after each click. If you click multiple times at the same location, the delay will apply from the last click.
Clicking on “Show more options”, you get access to more settings.
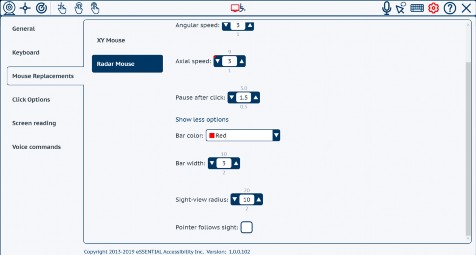
You can also configure color and size of the scanning bar and sight-view circle. The “pointer follows sight” flag has the same meaning as for the XY mouse.
You can see explanation in “Configuring XY mouse” section.
Managing Clicks
There are two things to consider, how to perform a click (which device is performing the click) and what type of click to perform (left click, right click, double click, etc.)
Click Trigger
The windows application allows you to use either a click device (mouse, switch, other software, etc.), an auto-click feature which allows you to click by stopping the cursor at a given position for a few seconds, or a click by voice command.
Standard-Click Device
This is when you use your mouse device or any other click device that can be a switch device or a muscle sensor or even another software.
The application allows you to perform the click on the press event instead of the release event of your device.
A standard mouse device performs the click when you release the mouse button to allow you, for instance, to do a drag and drop (where you press the button, move the pointer and release the button). However, in certain cases, an end-user may have issues controlling the release action as compared to the press action due to muscle contractions.
You can control this setting by ticking/unticking the check box “Click on button press” in the “Click options” settings.
Keep in mind that when using this “click on press” feature you will not be able to do a drag & drop as you usually do with your mouse device, as the click will fire as soon as you press the button.
For doing a “drag & drop” action you need to use the click buttons as explained in the “Selecting the click action” section.
Auto-Click
Auto-click performs a click when you pause the pointer at a given position for a few seconds. It comes within the application.
Given the way it works, the auto-click feature can be enabled only when using a mouse system where you directly control the cursor position. This is the case with a Standard Mouse and a Hands-free mouse.
For XY mouse and Radar mouse, the movement is automated and you stop where you want by clicking, therefore you cannot use the auto-click.
To enable auto-click in the standard mouse or hands-free mouse you must enable it in the settings of the corresponding mouse. By default, it is enabled for a hands-free mouse and disabled for a standard mouse.
When auto-click is running, you have a pause button that shows up besides the other click buttons. If you click on it, auto click will be paused and no click will be performed, the button then becomes a “resume” button. You can also pause the auto-click using the voice command “Pause auto-click”.
You can use this feature when you are involved in a long running activity not needing any interaction (like reading a text or watching a video) and you don’t want to be disturbed by an unwanted click. To resume auto-click just move the cursor on the “play” button for the dwell timeout or give the voice command “Resume auto-click”. It is important to understand that when paused, auto- click will work only on the “resume” button and nowhere else. So, do not park your cursor on the pause/resume button while watching a video because it will go back & forth between resume & pause.
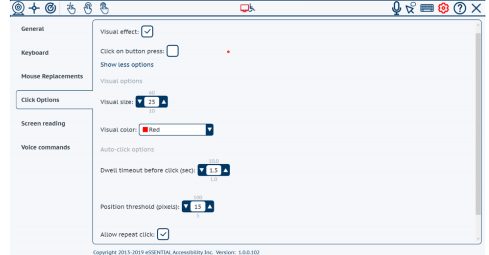
The configuration of the auto-click behavior is done in the “Click options” settings. Open the settings and select “Click options” on the left menu and click on “Show more options”.
In the auto-click section you can customize:
- The dwell timeout: this is number of seconds you need to stop the cursor to generate a click.
- The position threshold: this is the position tolerance to determine if the cursor moves or It is important because it may be impossible not to move the position of a single pixel. Every movement inside this threshold from the starting point is considered a pause for computing the dwell timeout. So, you need the cursor to stay within a circle whose radius is the threshold for the dwell timeout to generate a click.
- The ability to click at the same place tells the system if it must, or must not, repeat another click at the same place, if you do not move the cursor. If the “Repeat click” check box is ticked, a click will be performed every timeout if you don’t move the cursor. If it is unticked, then the autoclicking is paused until you move out of the threshold distance.
- The possibility to use your mouse device for clicking is also available.
Click By Voice Command
The voice command “Click” will perform a click.
When used in an XY or Radar mouse, you must take into consideration the delay between the instant you say “Click” and the instant where the speech recognition engine recognizes this command and processes it.
Depending on the speed you have selected in these mouse replacements, it may be difficult to control the click through voice command. After some training, one is generally able to understand with how much anticipation he must start saying “click” to have the desired click position.
Selecting The Click Action
The windows application allows you to perform some other clicks that are needed by some applications, like a double click on a desktop icon to start the application or a right click to get a pop-up menu. If you use a single switch or an auto-click feature it would be difficult to do that without the windows application.
To perform a click action different than that of a left click, select the click action by clicking on the corresponding button on the toolbar (which becomes toggled), and then click where you want.
For instance, if you are using a hands-free mouse and need to use a right click
at some point, you first go on the “right click” button on the toolbar to click on it, then move to your position, then the next click that will be performed is a right click. After the right click is done, it is automatically reset, and the following click will be a left click again.
For the “drag & drop” feature, it affects the two next clicks. Select the “drag
& drop” feature, then the next click will select the item and start dragging to where you desire, and the next click will end the dragging (drop). After the “drag & drop” is done, it automatically resets to left click.
You can perform all these actions with any of the mouse replacements including the standard mouse, as you may be using a single switch.
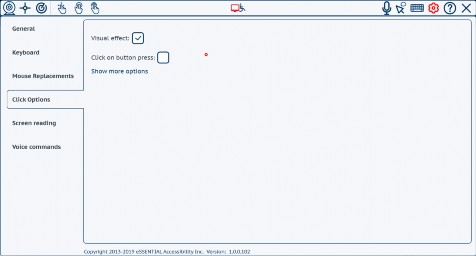
Improve Click Visibility
To improve the click visibility, the application can generate a visual effect at the location where the click takes place.
For enabling the visual effect, open the settings page and select the “Click Options” item on the left menu.
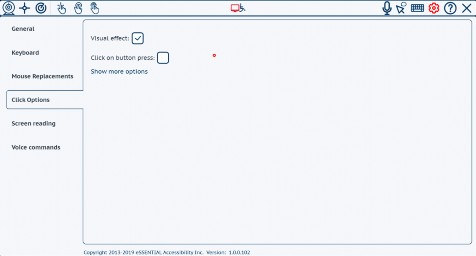
Tick the “Visual effect” check box to enable and untick the disable the feature. This visual effect will show in any mouse replacements you may be using.
You can customize the size and color of the visual effect using the two fields, Visual Size and Visual Color that you can see by clicking on the “Show more options” button.
APPENDICES
These features have been explained throughout this manual. To quickly find explanations of specific features, browse the lists included in these appendices.
- For a list of icons, see below:
- For a list of voice commands you can use to control eSSENTIAL Accessibility™, see Voice commands on page 45.
Icons
Not sure what our icons mean?
Here’s a list of them, along with their names and the pages where you can read more about them. If we mention an icon in more than one place, we’ll cite the first instance in the manual.
| For more information about this icon | See page |
|---|---|
 Double tap Double tap |
25 |
| 25 | |
| Exit application |
5 |
| 26 | |
| 65 | |
| Open virtual keyboard |
8 |
 Radar mouse Radar mouse |
35 |
| 25 | |
| Settings |
6 |
| 17 | |
| 32 |
Voice Commands
Much of what you do with eSSENTIAL Accessibility™ can be done using specific voice commands. You can retrieve the voice commands list by clicking on the “show commands” button in the voice commands settings.
To find out more about the process each voice command replaces, refer
to this list:
| Action | Voice Command |
|---|---|
| Main Commands | |
| Start the XY mouse | “Start XY mouse” |
| Start the radar mouse | “Start radar mouse” |
| Start the hands-free mouse | “Start hands-free mouse” |
| Start the hands-free mouse | “Start hands-free mouse” |
| Stop the current mouse replacement | “Stop mouse” |
| Perform a click | “Click” |
| Enable speech over | “Enable speech over” |
| Disable speech over | “Disable speech over” |
| Open the virtual keyboard | “Open keyboard” “Show keyboard” |
| Close the virtual keyboard | “Close keyboard” “Hide keyboard” |
| Open the settings panel | “Open settings” “Open options” “Show settings” “Show options” |
| Close the settings panel | “Close settings” “Close options” “Hide settings” “Hide options” |
| Show the online help | “Show help” “Show user manual” “Open help” “Open user manual” |
| Show the available voice commands | “Show voice commands” |
| Enable the dictation mode | “Enable dictation” |
| Disable the dictation mode | “Disable dictation” |
| Exit the application | “Exit” “Exit application” |
| Dialog Boxes Commands | |
| Click the ‘OK’ button | “OK” |
| Click the ‘Yes’ button | “Yes” |
| Click the ‘No’ button | “No” |
| Click the ‘Cancel’ button | “Cancel” |
| Close the dialog box | “Close” |
| XY and Radar Mouse Commands | |
| Revert the movement direction | “Reverse direction” “Change direction” |
| Increase the movement speed | “Faster” “Speed up” |
| Decrease the movement speed | “Slower” “Speed down” |
| Increase the speed to the maximum value | “High speed” “Maximum speed” |
| Decrease the speed to the minimum value | “Low speed” “Minimum speed” |
| Standard Mouse Commands | |
| Revert the movement direction | “Reverse direction” “Change direction” |
| Increase the movement speed | “Faster” “Speed up” |
| Decrease the movement speed | “Slower” “Speed down” |
| Increase the speed to the maximum value | “High speed” “Maximum speed” |
| Decrease the speed to the minimum value | “Low speed” “Minimum speed” |
| Start moving the pointer to the left | “Move left” |
| Start moving the pointer to the right | “Move right” |
| Start moving the pointer upward | “Move up” |
| Start moving the pointer downward | “Move down” |
| Set the pointer to a defined grid position | “Go to A 1” “Go to A 2” ... “Go to J 10” |
| Stop moving the pointer | “Stop” “Stop moving” |
| Show the grid | “Show grid” |
| Show the grid labels | “Show labels” “Show grid labels” |
| Hide the grid | “Hide grid” |
| Show the XY bar following pointer | “Show cross bars” |
| Hide the XY bar | “Hide cross bars” |
| Hands-free Mouse Commands | |
| Open the WebCam calibration | “WebCam calibration” |
| Set the pointer to a defined grid position | “Go to A 1” “Go to A 2” ... “Go to J 10” |
| Show the grid | “Show grid” |
| Show the grid labels | “Show labels” “Show grid labels” |
| Hide the grid | “Hide grid” |
| Show the XY bar following pointer | “Show cross bars” |
| Hide the XY bar | “Hide cross bars” |
| Autoclick Commands | |
| Pause Autoclick | “Pause autoclick” |
| Resume Autoclick | “Resume autoclick” |
| Select left click action | “Select left click” |
| Select right click action | “Select right click” |
| Select double click action | “Select double click” |
| Select drag and drop action | “Select drag and drop” |
| Keyboard Commands | |
| Press a letter key | “Press A” ... “Press Z” |
| Press a number key | “Press number 0” ... “Press number 9” |
| Press a prediction key | “Press first prediction” ... “Press fifth prediction” |
| Press any other key | Press “key name as heard with speech over For instance “Press enter”, “Press clear text”, ... |
| Increase keyboard size | “Increase keyboard size” |
| Decrease keyboard size | “Decrease keyboard size” |